Yesterday was the birthday of a very talented young Lady from Argentina, Cande Buasso – so happy (belated) birthday, dear Cande! Hear her from 2 years ago:
Okay, only one picture of the cat this time, a black & white one again, with her sitting outside on our veranda:
Bella, Mörfelden-Walldorf 2023
This month I got into a cat fight again, for the second time, and also for the second time I’ve got some marks to show. The first time was in the beginning of this year when the neighbours’ cat bit me in the foot, this time it was Bella who was scared enough to really bite my hand. “Only a scratch” I thought after the bleeding stopped, but then the hand got swollen, and I had to see the doctor to get another tetanus shot (after 20+ years), and had to take antibiotics until yesterday. This is what my hand looked like after my second visit to the doc, taken with my mobile phone:
It’s much better already, but like my wife said, that should probably teach me a lesson… 😉
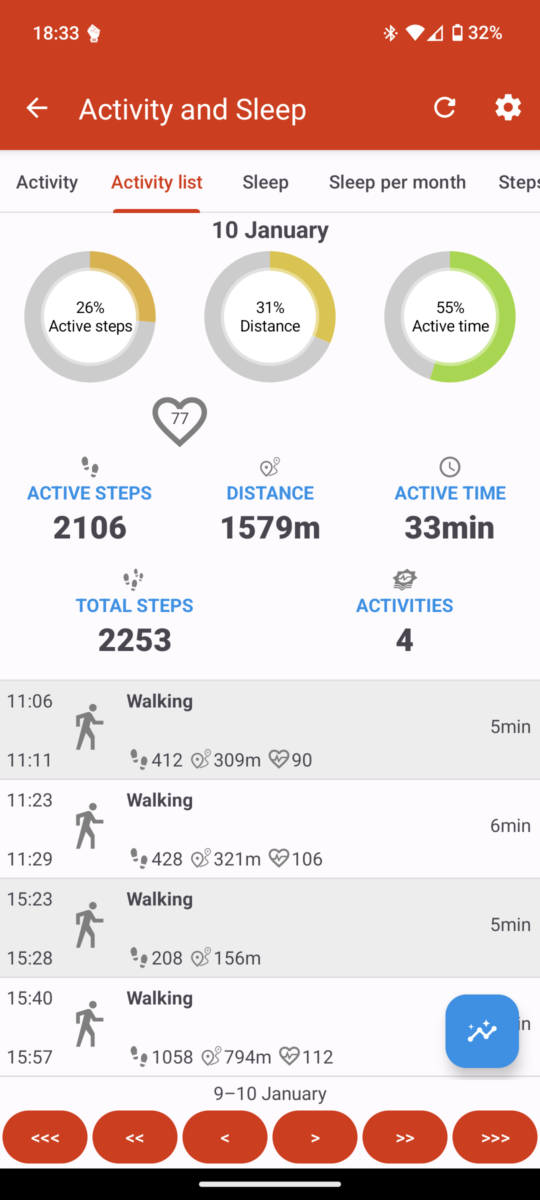
Other than that, I still walk and have my little step counter on while doing so. And Gadgetbridge gets better and better and with each version it supports the device a little more. I started playing around with the software in January, but since end of January I also set my goal to 10,000 steps a day, which I’ve kept since then. This is from two days ago:
Not a miss since 60 days, and a total of some 800,000 steps since I use this software, which with a step length of pretty much exactly 75cm translates to 600km until now.
Not as much as Andersen’s Knud (from his “Under the willow tree” or in German “Unter dem Weidenbaum”) who went from Kjöge (near Køge in Denmark) all the way to Nürnberg and Milano and half way back) but seeing a radius of 600km from our place still makes me kind of proud:
If there would be a straight way to walk, I would have reached Vienna by now (Aaahh, Vienna, that reminds me of Billy Joel’s famous song about it – read the story here or listen to the original here).
Or I would be short before Genova by now, or – if you’d grant me a ferry ride since I can’t yet walk on the water – London. Pretty cool thought. So I’ll keep walking (Billy Joel has more songs about cool places, how about “Zanzibar” for instance? And yes, I know that he probably didn’t mean the island in this song, but still) 😉
Anyway, in case you’re a Christian I wish you Happy Easter, and in case you’re Muslims then Happy Ramadan instead. For all others, like always, have fun, and thanks for dropping by and reading.
So it’s a leap year again, and today is the leap day. Cool for those who are born on that day, they don’t age that fast 😉 Anyway, here are some photos of our cat, in the order that I took them during the month:
In other news, this month was also my birthday. And I’ve got a nice surprise present: the latest novel from Haruki Murakami. Cool; many thanks again! It’s wonderful like most of his work.
And since I have more or less everything I need, I didn’t have a real wish list – but also got a Raspberry Pi 5 which I used to set up with a Pi-Hole DNS sink / ad blocker / tracker blocker and a Wireguard PiVPN for the family already. The load (like in top) with that software installed and running is still 0-0-0, which means the machine is just yawning about these tasks, let’s see what else we can do with it. Cool little machine, the CPU is an ARM one like in your typical mobile phone (but 4 cores instead of 8 or more).
Also got the latest updates of Gadgetbridge on my phone which keeps getting better and better together with Xiaomi’s Smart Band 8.
Anyway, and as always, thanks for reading and viewing.
Two days ago I took a “selfie” again, using one of my studio strobes and converting the image with a Kodak Tri-X film simulation in Silver Efex:
And today I took a photo of Bella while she was outside on the fence (in front of a Kindergarten). This one I converted using an Ilford HP5 film simulation in RawTherapee:
So there you have it – two recent pictures of the cat and myself, both in black & white. Like always, thanks for viewing.
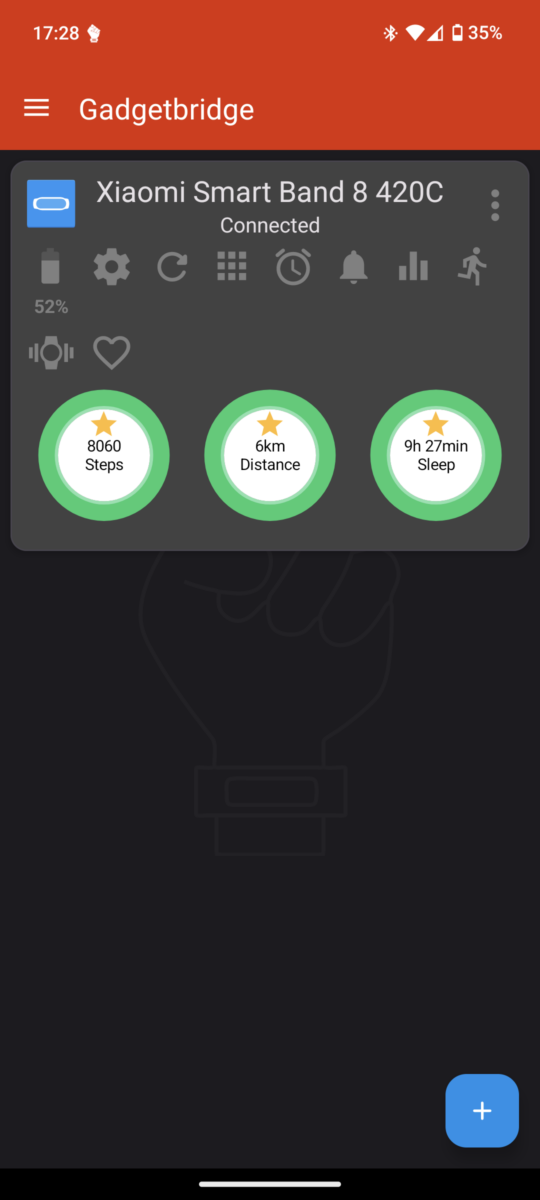
I have my fitness band since a bit over a week now (it’s day 8 to be more precise), and yes, it’s fun, and also a motivator to get moving a bit more again after the pandemic and my retirement. I look at its results using Gadgetbridge, a free and open source software which doesn’t share any of your data with the internet – that’s my job and decision, right? So here’s how it looks after a day with reached goals:
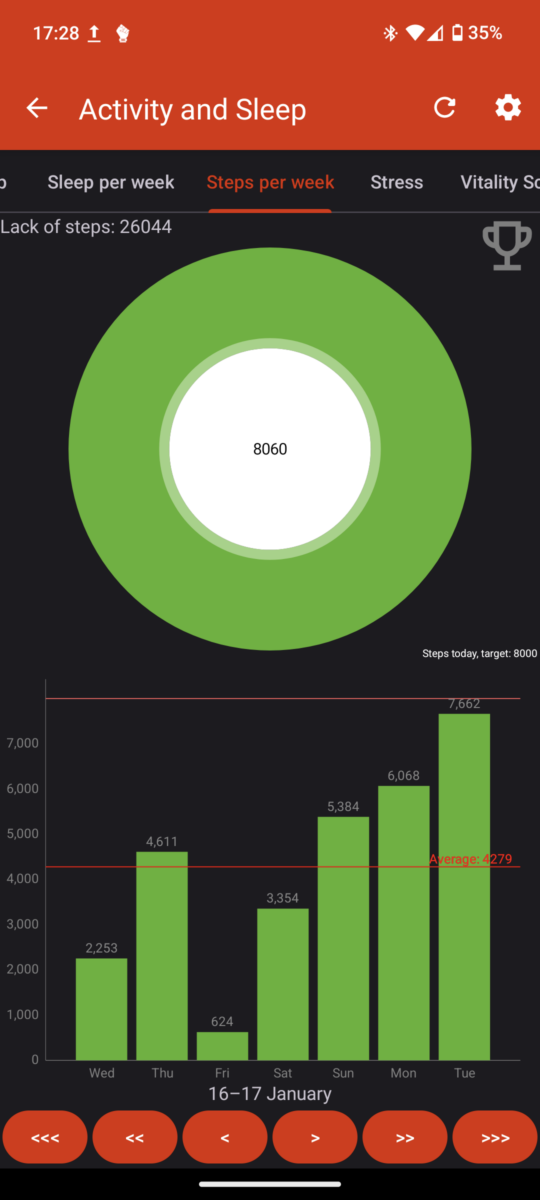
Or like this:
As you can see, I raised my level over this first week, and I find Gadgetbridge’s goal of 8000 steps a day to be a good target for a 60+ year old like me. On Friday, I was lazy, didn’t get out at all, but those 624 steps can be misleading… let me explain.
Normaly, I tread lightly. I walk the flat with socks on wood, and partly on more or less thick and soft carpets, and that Xiaomi Smart Band 8 doesn’t register all these “light” steps (like the ones when you’re carrying a cup full of coffee or so). Instead, you have to “walk with intent”, as I like to call it. A brisk outdoor walk is best, and that’s what I mostly did.
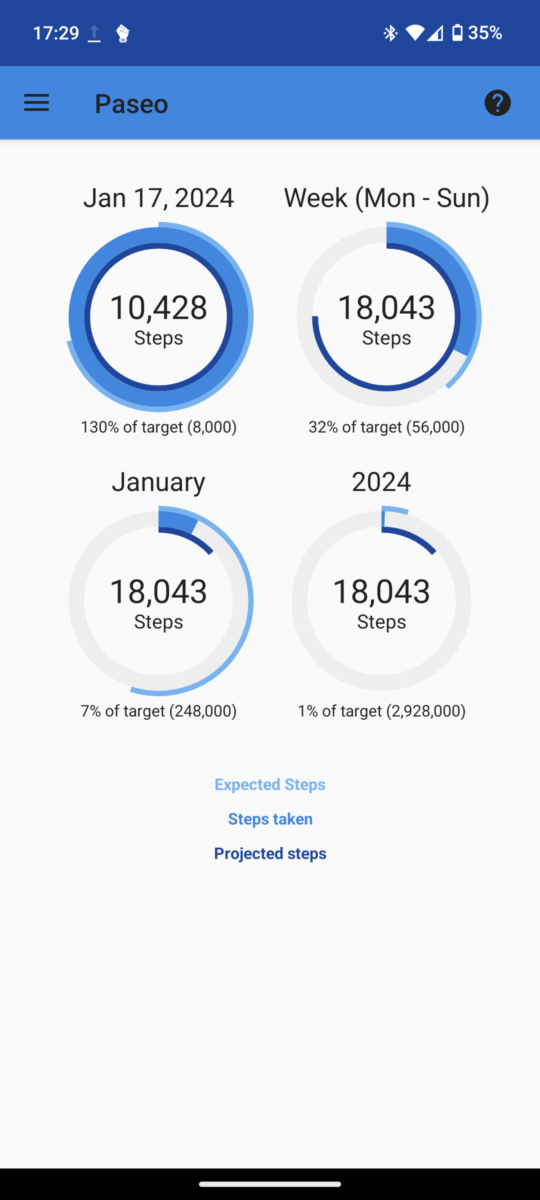
I have another program on my phone, also open source, and that’s called “Paseo”. That one *does* register all these lights steps inside, so in case I (or you) want my real step count of today, it thought about 10k+ rather than 8k+. See here:
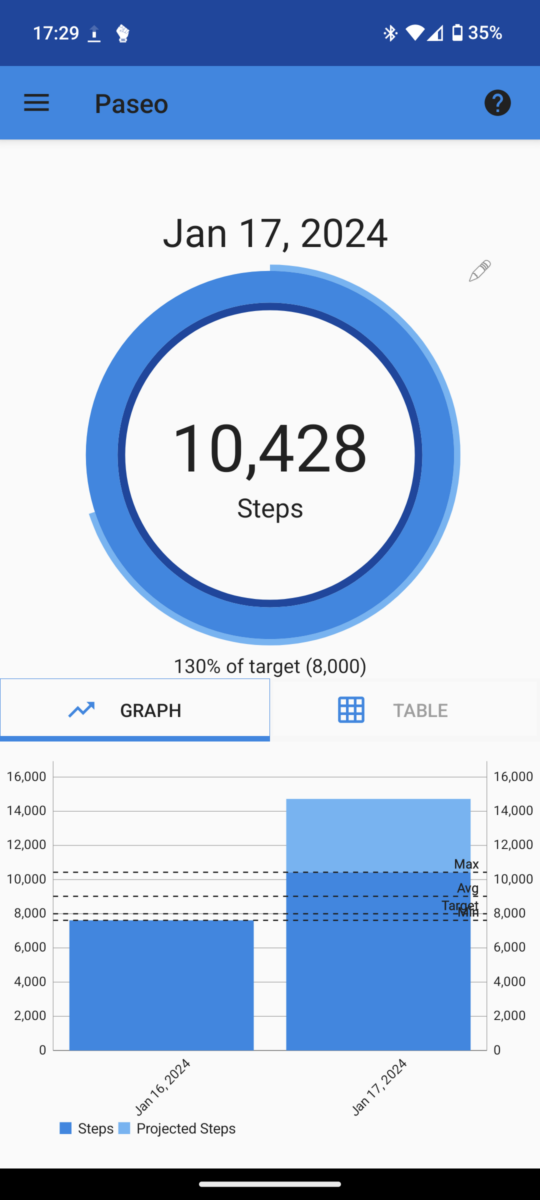
Or like so:
Paseo has the usual target of 10000 steps which I reduced to 8000 to make it more comparable to Gadgetbridge. Xiaomi’s own Mi Fitness app has a target of 6000 by the way, which is also fine. Main thing is to get moving, right?
I was considering to bring my tracker back to the store and change it to another one, like the Amazfit Band 7, or the Xiaomi Smart Band 7 (or even one of Huawei’s which are now also supported by Gadgetbridge). But I’m not sure about that, I can live with the fact that a “fitness” band only tracks when fitness also counts, and for that it doesn’t have to register every step between computer chair and couch… and who knows if the other devices would be better in that regard? The New York Times tested the Fitbit Inspire 3 as the one which came closest to a real pedometer, but that one would “phone home” to Google all day long, so pick your poison as they say… (or take a real unconnected pedometer if you’re serious about that – they link to the one they compared the devices with) 😉
Oh, and before I forget it: yesterday – so more or less exactly after a week of charging the device to 100%, it still showed 57% battery life left – which means you can easily reach two weeks with that small fitness tracker. Another reason to probably just keep and to be happy with it.
No – this is no “best of” list like you find them everywhere, with 10 or more randomly chosen products and “affiliate links” to big online stores. This post is about security, because that’s what matters, not how great a product looks and feels in your hands, or how nice the photos are which can be made with their cameras, or all the new(ish) “AI” stuff built into them.
Since a few years now, arm – together with Google – are developing something they’ve called “Memory Tagging Extensions”, or short: MTE. That’s a mitigation against 0-day-exploits, and thus, important. The arm developers explain it on their blog, and you can also read their white paper about it in case you’d like to know what it is and how it works.
And now you can actually buy the first product which has that built in – and it’s:
The Google Pixel 8 (and The Pixel 8 Pro)
And no, it’s not enabled by default yet (except if you run GrapheneOS instead of Google’s own version of Android), but if you don’t mind your phone to being run in “developer mode”, you can read how to enable it yourself on Google’s “Project Zero” blog.
No silver bullet, that’s right. But both the arm and Google’s developers are to be complimented about that, even the DevOps from GrapheneOS (and also DivestOS) do that – and recommend the Pixel 8 (or 8 Pro) above all other handsets. Security better than that of an iPhone, as was reported elsewhere (but that’s another topic).
Even if you own a Pixel 8 (/Pro) and do nothing, I’m sure that Google’s team are testing it, and that they will activate the feature per default with one of their next (monthly) updates. GrapheneOS, like I wrote above, does use it already, so that’s my OS of choice even on my older Pixel 6a (which doesn’t have MTE built into it, but I’ll still use that as long as it’s supported (July ’27 according to Google, and GrapheneOS supports it until then as well – after that I’d have to change it to DivestOS)).
Oh, and re: support cycles – for the Pixel 8, that’s 7 years, so even if it costs a bit more, I’d most probably choose that one over a Pixel 7a. Let’s see if the next phones (8a and newer) will also be supported that long. So another thing to applaud, and we should avoid waste and that that into account (and no, the “Fairphone” can’t compete on any level, even if that’s theoretically supported a bit longer).
Okay, second night with my fitness tracker, and Gadgetbridge shows light sleep for almost 8 hours (and also a few counted steps in the flat). After reading a bit more about the software, I’ve changed my weather provider on the phone to “Tiny Weather Forecast Germany” which comes from our official DWD (Deutscher Wetterdienst) site who are also reporting to Tagesschau and other official media. That one is nicely integrated with Gadgetbridge, so that my fitness tracker now shows the temperatures as reported by DWD, instead of some unknown Chinese service.
I also changed my phone’s navigation system from Organic Maps to OsmAnd~ which is supported by Gadgetbridge (even Google Maps is supported, but any Google services is what I’m trying to avoid with all this). I have not yet tried any “Activities” or “Workouts” which would make use of map tracking, but I will do that soon (next on my list in fact).
Anyway, it’s nice to know that communications only occur between my own devices now, and that *nothing* goes to some unknown “cloud services” (aka other peoples’ computers). Except of course the fact that my phone gets the weather from DWD, so it also has to tell them where I am to keep that correct. That’s unavoidable, but I can live with that…
And like always, thanks for reading.
Update to this update 😉
Just saw that the battery status was different on the device and in the software, so I submitted a bug report against Gadgetbridge. See here.
And another update to this update (of the update) 😉
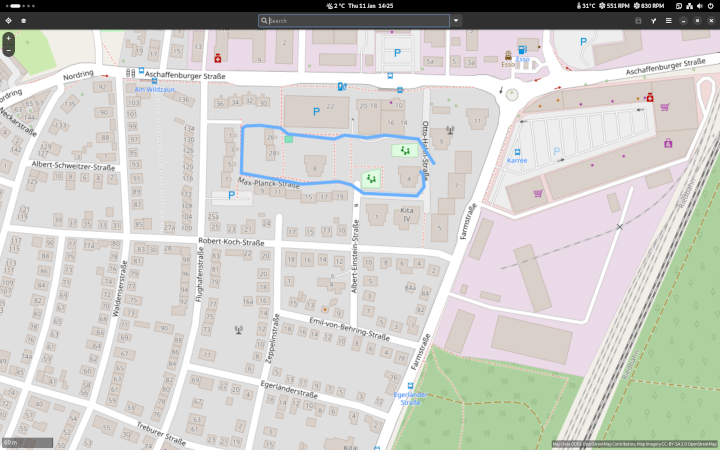
Yup; tracking works. First I didn’t exactly know how to *get it working*, so I tried with the Mi Fitness app first, but later found out how to view the “workout” in OsmAnd~. Here is how that looks:
Mi Fitness left – Gadgetbridge displayed in OsmAnd~ right
In the Mi Fitness screenshot, I had to take out my “customer number” (or whatever they call your digit-only user number at Xiaomi), so I airbrushed that out with The Gimp. Gadgetbridge and OsmAnd~ show nothing personal, except of course the area where we live. Took the small inner round through our “Wohnpark” in the Mi Fitness image, the bigger around the block walk in Gadgetbridge/OsmAnd~.
You can also export a .gpx file from Gadgetbridge, which is what I did to import it into Gnome Maps on my desktop – looks like this (with a shorter walk):
An exported .gpx route, here shown in Gnome Maps
Not bad for “experimental”, is it? Again, thanks for reading and for viewing.
Yesterday I bought a fitness tracker. My wife and daughter both have one since long, and I started counting my steps when I first got an iPhone from the company, and later the used Google Pixel 4a from my wife. And while counting steps with a phone is good, and all that most people would probably need, I still also wanted those steps when I do *not* carry my phone, plus having a look at some other statistics like sleep tracking and so on.
Both Mitchie and Zuleikha (or Aki, which she prefers) are using FitBit devices. Mitchie lost her Charge 4 last year and got the Charge 5 soon afterwards, Aki has her Inspire 2 since about that time (or a bit earlier). But I didn’t want to go the Google route, and here’s why. Mike Kuketz, a German security consultant once mentioned an open source tracker software which doesn’t send every measurement to the big clouds for their analysis, so I was interested in that program called “Gadgetbridge” since a while. The best supported devices are those from Huami (aka Amazfit) and Xiaomi which use Huami’s “Zepp” app, but since the last update to Gadgetbridge, even some newer devices which use different protocols are supported – see here.
So my initial plan was to get a Xiaomi Smart Band 7 or an Amazfit Band 7, both of which originally use that Zepp app, and both being able to be used with Gadgetbridge instead. However, at our local electronics chain store, only the newer Xiaomi Smart Band 8 was offered, so I took that one instead. And to make matters short (or TL;DR in “modern” speech): no, I haven’t got it running with Gadgetbridge yet (support *is* still experimental), but I’m still glad I got this one, even tho it feels a bit strange to have a secure system like GrapheneOS, and then to install Xiaomi’s Mi Fitness software onto it – but in the long run, this will most probably change.
So what is it like? Well it counts my steps (and less than the free and open source “Paseo” software on the phone before, but it’s said to be pretty accurate), it also tracks my sleep, counts my heart beats, blood oxygen, and all that stuff – what most of these devices do. The Xiaomi software is pretty colourful, as are the hundreds of watch faces you can install with a single click. Here are some screenshots of the software running on my phone:
In case you want a comparison of some of these devices, here is a German one from FitForFun, and the guys from Heise’s Techstage had an almost similar result. But of course they don’t even think about using said devices with free and open source software, so choose wisely. Of the older generation (compatible with Zepp apps and such with Gadgetbridge, except the Huawei device), there’s also a nice video, also in German, here.
I will report more later, since I have the device more or less since a single day only, and this is my first one (although I can compare it to those FitBits, and to be honest, Aki was a bit jealous about that Goose watchface you could choose for mine)… 😉
Like always, thanks for reading.
Update, later on the same day:
Got Gadgetbridge working by now on the Pixel 6a (had tried it on the 3a before). And I’m still exploring it of course, but here’s a first screenshot from the phone:
Gadgetbridge working with the Xiaomi Smart Band 8 on the Google Pixel 6a running GrapheneOS
So for the moment I’ll have deactivated Xiaomi’s app and this one active instead. Switched the battery usage from ‘Unrestricted’ to ‘Optimised’, because this doesn’t have to be active when I don’t want it to. So let’s see how this develops. But I’m glad that I’ve been successful.