Three different – but “canned” – black & white conversions

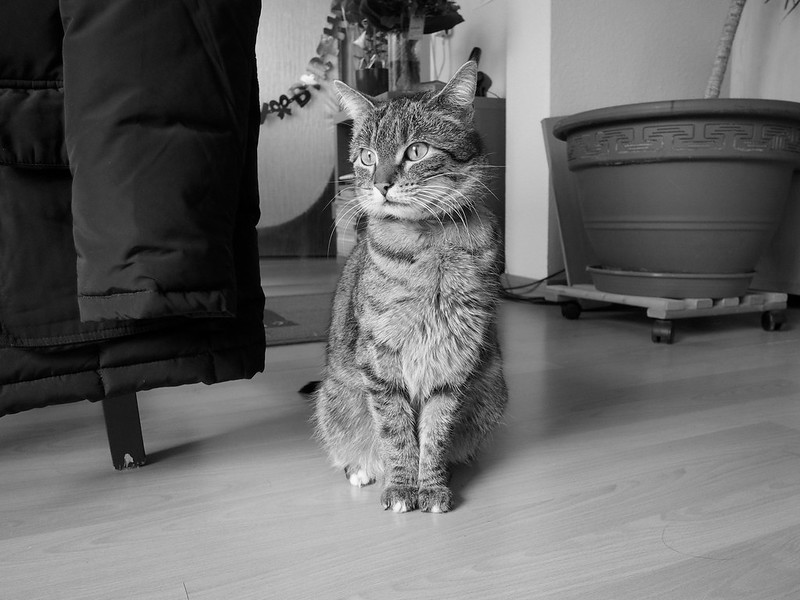
Here’s a photo from Tuna from this morning. First one with “monotone” conversion, like Olympus calls it, by the Olympus Viewer 3 software – which does the same like when you set the camera to black & white directly:

7e0_2133368bw-tuna

Tuna the cat, February 2016 (out of camera)

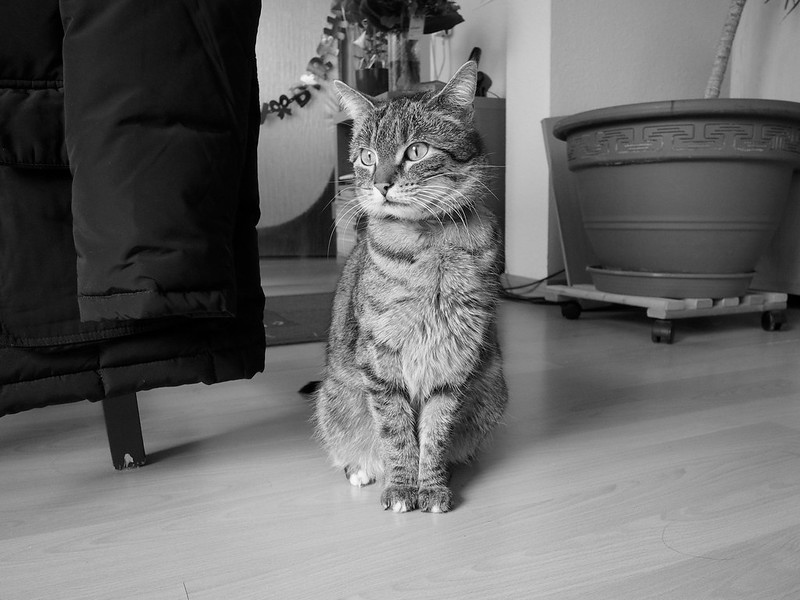
For the second one I used RawTherapee’s channel mixer on default settings:

7e0_2133368-tuna-rt-cm

Tuna the cat, February 2016 (channel mixer)

And the third conversion was done with using the luminance equalizer, also with RawTherapee:

7e0_2133368-tuna-rt-le

Tuna the cat, February 2016 (luminance equalizer)

As you can see, the out of camera black & white and the one where I used the luminance equalizer are almost identical, so this is how Olympus does it in camera. If you do it in RawTherapee you can still fine-tune some settings, but as a starting point they’re both pretty close.

The channel mixer – with its default settings, more to that in another blog post – treats at least the blue channel differently, see my dark blue jacket on the chair, or the small carpet behind the cat (or the letter “R” of the “Happy birthday” in the background). Here you can adjust each of the colour channels separately and simulate different black & white films (I guess – but still have to check – if the also “canned” film simulations do the same with adjusting those channels only). I’ll test that later.

In the Gimp, there’s that very interesting GEGL C2G conversion. But with using Debian stable, I’m also still using the Gimp in version 2.8.x (also stable), and only the current developer version (2.9.x) uses more than 8 bits for each colour, so tests with that have to wait (I guess the jump will be as big as the one if you go from Photoshop Express to the real big – and expensive – version).

The photos you see on the internet are all 8 bits per channel only, since standard RGB jpg files are 8 bits, compressed. But it’s still a big difference for printing and also if you work with other colour spaces on a calibrated monitor (the best of which are 10 bits / channel).

Anyway. Before I get too technical, remember that it’s the *content* of the photo which counts.

Thanks for reading.

Piano practice

I wanted to show you that according to my last howto about mixed light, you can apply this to real photos (instead of taking photos of empty chairs only):

7e0_1248079-piano-practice

Piano practice. Zuleikha, January 2016

Like described in my previous howto, I did the following:

1. I set my camera to manual exposure. It will default to ISO 200, and to 1/160th of a second.
2. Since this isn’t enough exposure for the ambient light in the evenings and in our flat, I opened the lens fully to f/1.4, and set the time to 1/13th of a second. The camera showed -2EV underexposure with this setting.
3. White balance on Custom White Balance 2, like applied and described in my last post.
4. Now I mounted my Yongnuo compact flash (YN-460-II) directly onto my camera, Roscosun 85 gel in front of it, and pointed it upwards against the ceiling.
5. Lowest power setting on the flash – I only wanted a small “kiss” of light from this one, to get Zuleikha’s face lightened up a bit against the surrounding.
6. Take your shot(s).

In “post production” (you *do* shoot raw, n’est-ce pas?), I corrected that CWB2 to about 200 Kelvin less, with tint setting +1 in the direction of amber (instead of green). In my eyes and on my calibrated monitor that looked more natural than the warmer setting I had before. I also corrected the tonal curve to brighten up the lower midtones a bit.

Like usual, I put in some title and tags using RawTherapee. Done. Upload to Flickr and insert it here to write this article about it.

To learn this and much more, consider reading David Hobby’s Strobist site. Go at least through his 101 course which costs absolutely nothing (not even a subscription or login). Then get some cheap lights (like my 40$/€ Yongnuo), and get going. It’s fun – and like someone once said, if you take a picture, you might as well try to take a good one.

Thanks for reading.

Howto: mixed light

Modern cameras have more than one setting for saving a custom white balance – my Olympus E-PL5 has two, and my OM-D E-M10 (first generation and still a marvelous camera) has four. And if you want to mix flash with ambient and warm lighting, you should make use of that.

In my cameras, I have the custom white balance 1 set to my studio strobes, and custom white balance 2 set to my Yongnuo compact flash with a Roscosun 85 (3401) CTO gel. That’s one of the companies who make colour gels for film, and they offer a cheap strobist kit for the rest of us. If you want to mix your flash with surrounding available light, one of these gels will lower the colour temperature of your flash from 5500K to 3200K which gets you into the territory of “warm” lights which are used just about everywhere.

This is how to do it with Olympus cameras:

Set up a grey or white target, and set your camera to custom white balance two (or one if you do it without using that gel). Then put the gel in front of your compact flash, and press the info button on your camera. The camera now asks you to shoot your target, so do it. If you have a small target – I use the Colorchecker Passport which fits in any camera bag – then this is best done with the 45mm/1.8 lens or with a kit zoom at its longest setting of 42mm (for Olympus cameras, yours might be longer). The target does *not* have to be in focus (in fact it’s an advantage if it isn’t), but it should fill the frame. After shooting your target like that, the camera will ask you if you want to save this custom white balance. Say yes. Done.

If you then take another normal test shot, still with the orange gel in front of your flash, your target should look pretty neutral, like this:

7e0_1173072-grey-target

Grey target with Roscosun 85 (3401) CTO

Now you can use your flash for mixed lighting, so raise your exposure time to catch some of that as well (aperture controls flash exposure, and time controls the rest). It may look like this:

7e0_1173074-mixed-light-cto

Mixed flash (CTO) and ambient (LED)

Here the bounced flash with CTO gel in front of it lit the table and chair, and the wall to the right. The background is an LED light in our kitchen, maybe 2 stops underexposed. This still has some green tint as you can see, but it’s lots better than if you used the flash without gel, and with the camera set to daylight or flash or around 5500K. If you really need precision, you can still fine-tune between both light sources, or if you *have to* nail it, then use flash for the background as well, and forget about the gels.

But this is a quick and useful technique if you’re out in the pubs or other environments, and want more or less proper colours not only for your main targets (persons for instance), but also for the background.

You can do lots more with these gels, so try them out. A ‘strobist kit’ isn’t that expensive, and can work wonders for whatever you might have in mind.

Hope that this is useful to someone.

Happy experimenting, and, as always, thanks for reading.

Fifty shades of black

Someone recently asked about an article which I’ve written earlier, but which cannot be restored – we don’t have a database backup from that time. It was about the blacks in my photos. And today I’ve got a somehow similar question by email from a friend. And looking in front of myself, on my desk I saw lots of black (or at least very dark) stuff, so I decided to take a photo of it:

7df_c218024-fifty-shades-black

About the technique I use:

– first, I make sure that I have the correct exposure. While for many outdoor scenes I can trust the center-weighted setting of my cameras, indoors I always use a light meter, especially when using a studio strobe like I did here.

– second, and maybe of equal importance: I use the widest possible colour space I can get from my cameras, which is AdobeRGB (instead of sRGB). Some modern printing systems can go even wider, but there aren’t many non-pro cameras on the market which can be set to take Profoto images.

– I expose “correctly”, which means I take everything I can get into the 12 bit dynamics of my cameras. If you have 14 or even 16 bit, all the better for you.

– then I convert from the raw .orf files to 16 bit .tif using the Olympus Viewer 3 raw converter, checking for any over- or underexposure again, and also for a correct white balance (which was set in camera already, but sometimes it can still be enhanced). OV3 doesn’t exist for my Linux machine, so I dual-boot into Win10 or fire up s small Win7 virtual machine to do this. I’m on SSD nowadays, so both ways are fast.

– back in Linux, I use RawTherapee for final checks, conversions to black & white, cropping, and to give images some more Exif data, like a title and some tags.

That’s mostly it. I think the most important steps are to set your camera to AdobeRGB (or to whatever the biggest colour space it offers), and to expose correctly. Having a current sensor with a wide dynamic range (check DxO for this) also helps.

The rest – and any post processing – is up to personal bias and taste. Look at Ming Thein who does a very good job concerning the blacks in his images. Another example would be the Leica photographer Thorsten Overgaard.

Hoping that this is useful,

thanks for reading.

A change in perspective

Today at the office I was talking about cameras and lenses with a colleague. He mentioned zooms, and even “super” zooms with a wide range of focal lengths, and these are really popular, especially with beginners of photography.

Wide angle lenses are for landscapes, “normal” focal lenghts for “normal” photography, and tele lenses for things far away, like wild animals. Right? Well yes, and I had to think about the fact that most people use their zoom lenses just like that. They stand still in the same position, and turn the zoom ring, and voilà – they have totally different pictures. Like these:

_6237806

14mm (equivalent focal length with a film, or a so-called “full frame” camera: 28mm)

_6237805

25mm (50mm-e)

_6237804

42mm (84mm-e)

Well – are these photos really that different? I don’t think so. And why not? Because they were all taken from the same spot, with only the “zoom” (the focal length) changed, nothing else. And that means that from the first photo you could actually take crops, or print them out and then cut off the borders, to get the second and the third photo. Ok; depth of field would be a bit different, but the perspective did not change.

But a changed perspective is for me the biggest advantage of having different focal lengths. What if we try to keep the cup on the right, and the word on it at almost the same size with these three different focal lengths? We would get something like this:

_6237802

14mm (28mm-e)

_6237803

25mm (50mm-e)

_6237804

42mm (84mm-e)

Now these three pictures are indeed very different, because I changed the position of the camera to keep that cup at approximately the same size, and with doing this, I changed the perspective quite dramatically.

This also explains that even when keeping the focal length the same (and thus, changing magnification), the term “zooming with your feet” is totally wrong. If you move, you’ll change perspective, simple as that.

Look at the first three photos again. The dark blue, almost black cup in the background doesn’t have something written on it, it’s uniformly dark blue, or almost black. Right? Wrong, if you look at the lower three. There are many more hints even in this simple (and otherwise kind of boring) example of how perspective changes everything. The “compression” effect for example: with a longer focal length and the camera farther away, distant things seem to come nearer to the front objects. Of course they don’t – I moved nothing in this scene except the camera, but the relative distance of those objects to each other shrinks indeed if you consider that the camera is more distant in the 42mm photo. Same goes for the “surrounding” of the objects: a shorter focal length even when used close shows more “context” than a tele lens which concentrates your view on just those objects.

All these photos were made with an Olympus E-PL5 and its 14-42mm “kit lens”, but once you start thinking about different focal lengths as ways to influence and change your perspective rather than just the angle of view, you’ll discover totally new views on your world. It’s fun even with a simple and cheap kit like this, so use what you have already, and start experimenting – and learning to see. And all of a sudden, be it landscapes, animals, people, whatever, you’ll learn how to deal with your backgrounds, and what you want to show and include, and what to leave out. You’ll learn what position you have to be in to get what you want – and that’s a lot more than just to stand still and to turn that zoom ring.

As always, thanks for reading.