Two portraits from today:

Thanks for viewing.
Music. Photography. Thoughts.
Two portraits from today:
Thanks for viewing.
Olympus Germany has some special offer which runs out tomorrow. You can get some of their single focal length lenses (primes) for Micro Four Thirds discounted, between 50€ and 150€ cheaper than usual.
I thought about the 17mm for a while, but we have 14mm (me) and 20mm (Mitchie). I also thought about the 60mm macro, but we have two 50mm macro lenses, one OM which is still a manual one, and the ZD 50mm/2 macro from my Four Thirds camera which has autofocus and a one stop advantage over the newer 60mm one.
And then there is the 75mm/1.8 on offer, and it’s about 30% cheaper than usual. Surely an incredible lens, and a very good offer, tho it still costs some serious money – more expensive than any of our camera bodies for instance.
So like I usually do, I take some of my kit zooms and try them on the focal lengths on offer. Did (and showed) a 17mm portrait of my colleague Arno lately, and today I was testing my longer zoom at 76mm inside of our flat.
And that is the keyword: indoors. I knew from my days with a film camera that a 135mm lens was always a bit too long for me, at least when using it indoors – so during that time I always wished for a 100mm or even a 85mm. And today? Let’s see:
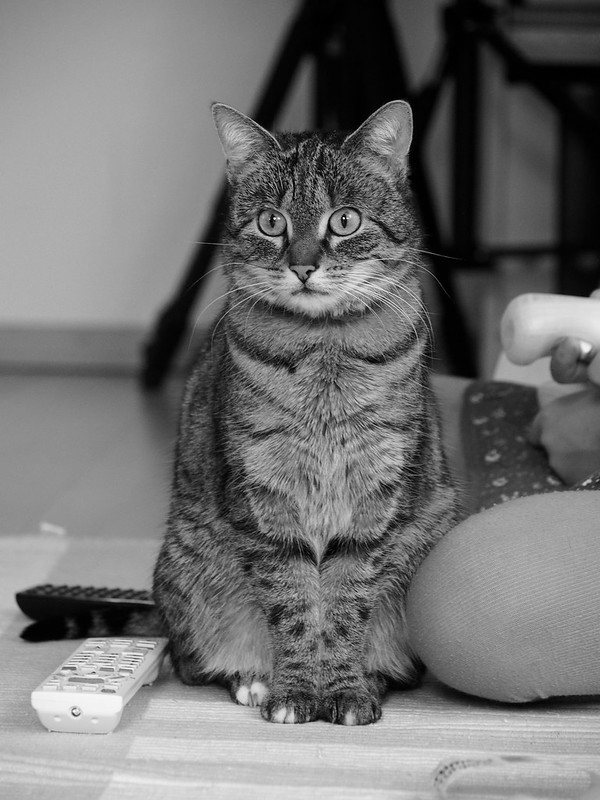
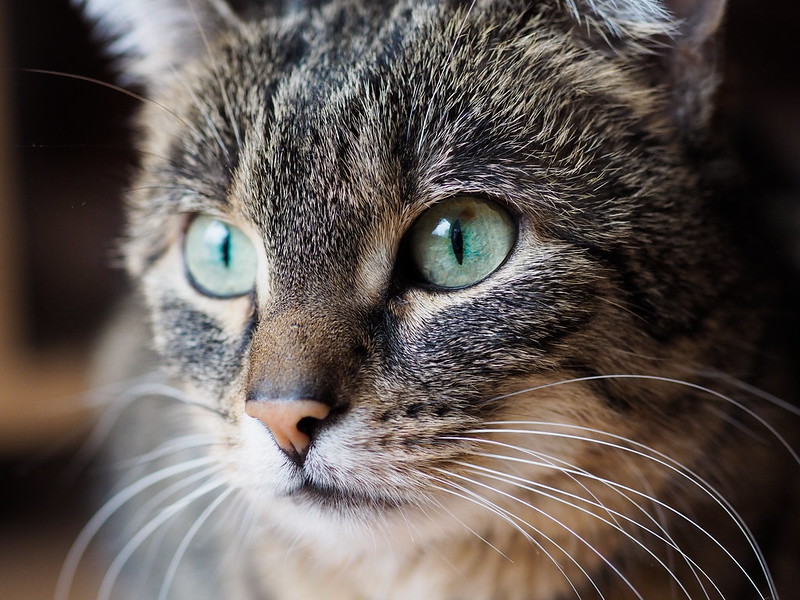
Tuna with 76mm
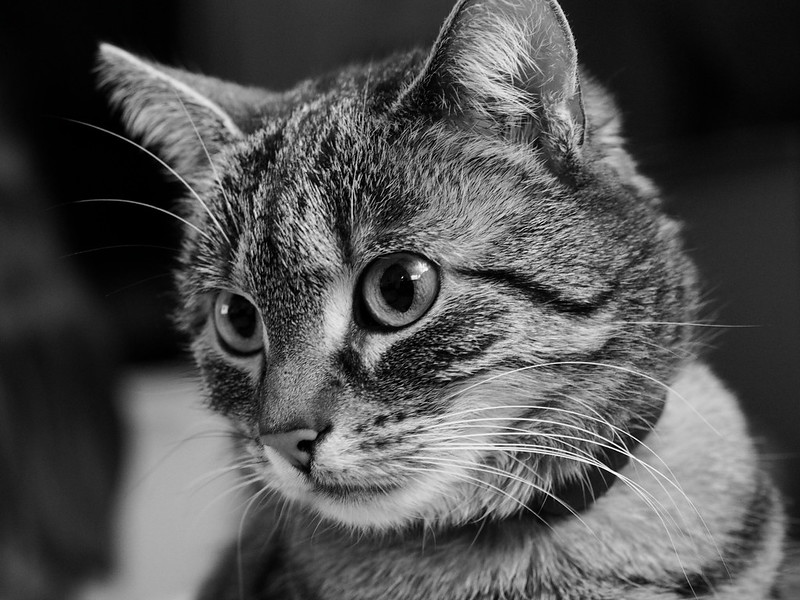
Tuna with the 50mm macro lens

Zuleikha with 76mm (across the dining table)

Zuleikha with the 50mm macro lens (same distance)
I’ve tried some more, but what I found is the same as some 30+ years ago: indoors, a lens of 135mm or even more (the 75mm Olympus one would have an angle of view like a 150mm lens on film) is good for only one purpose: really tight “head shots”. If you don’t keep some distance you have to use it in portrait orientation to even get the shoulders.
Which means that my 50mm macro or the 45mm/1.8 M.Zuiko lenses we have already are much more useful when space is restricted.
That 75mm lens would be wonderful to have for things like half portraits (belly-up) outdoors – when used wide open at f/1.8 that would blur your backgrounds quite nicely, almost like that 135mm/2 from Canon which can really separate things from the backgrounds. Or rather like a 85mm/1.8 on film (most of which aren’t as sharp as this Olympus when used wide open).
But indoors? I think we can be glad with what he have already.
Technical: the first three photos were taken with a mix of daylight and some lights which were switched on during the day. The last one was taken using two studio strobes, one from above through a gridded beauty dish, and one reflected from a wall on the other side of the table.
P.S.: here’s another one I took using my 50mm macro today, a still life:

Oh, and before I forget it: since late last year, an Irish photographer sold a photo of a potato for 750.000 Pounds (approximately a million Euro or Dollar), I’m offering this one on Alu Dibond under Acryl in 30x40cm for the sum of 2.000.000,-€, no negotiations possible. And all those who don’t have that much can still download it in full resolution on Flickr – see side bar or click on the picture to get there. If you have it printed yourself, you’ll save some spare change, which you can send to us. SCNR… 😉
Thanks for viewing.
One week ago, I took a photo of my colleague Arno with my Olympus E-PL5 and its 14-42mm “kit” lens set to 17mm. That small zoom lens opens up to f/3.8 at this focal length. Looked like this:

And today, I took almost the same photo of him, but this time I used my Olympus E-M10 (different camera but same sensor) with the Panasonic Leica 25mm/1.4 lens fully opened to f/1.4, which then looks like this:

Both are in-camera black & whites, with a simulated orange filter (at least this is what I’ve set when converting them from the raw .orf files using Olympus Viewer 3).
I like both. 17mm shows a bit more surrounding, while 25mm concentrates more on the subject. And of course the wider aperture of the prime lens blurs the background more than the zoom can do. But I also like the reflection of the Deutsche Bank building in the first picture, so it will take some time to decide whether I prefer one of these over the other.
Thanks for viewing.
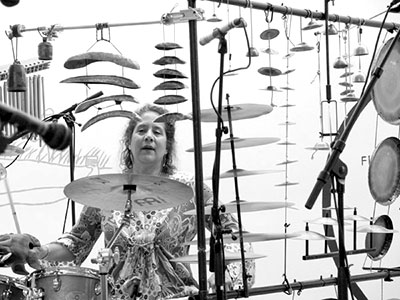
At work I’m just listening to Jan Garbarek’s “Rites” CDs again to blend out some background noise with something not as disturbing, so I can keep concentrating.
And as always, I’m most impressed by that music, and by the musicians. The drummer is exceptional – it’s Marilyn Mazur. The Wikipedia page states:
“Down Beat has on six occasions rated her No. 1 Jazz Performer”
– and they’re so right. Wonderful music, wonderful musicians.
The photo of her is © by Hreinn Gudlaugsson, under a CC 4.0 license.
Thanks for reading.
I wanted to show you that according to my last howto about mixed light, you can apply this to real photos (instead of taking photos of empty chairs only):

Piano practice. Zuleikha, January 2016
Like described in my previous howto, I did the following:
1. I set my camera to manual exposure. It will default to ISO 200, and to 1/160th of a second.
2. Since this isn’t enough exposure for the ambient light in the evenings and in our flat, I opened the lens fully to f/1.4, and set the time to 1/13th of a second. The camera showed -2EV underexposure with this setting.
3. White balance on Custom White Balance 2, like applied and described in my last post.
4. Now I mounted my Yongnuo compact flash (YN-460-II) directly onto my camera, Roscosun 85 gel in front of it, and pointed it upwards against the ceiling.
5. Lowest power setting on the flash – I only wanted a small “kiss” of light from this one, to get Zuleikha’s face lightened up a bit against the surrounding.
6. Take your shot(s).
In “post production” (you *do* shoot raw, n’est-ce pas?), I corrected that CWB2 to about 200 Kelvin less, with tint setting +1 in the direction of amber (instead of green). In my eyes and on my calibrated monitor that looked more natural than the warmer setting I had before. I also corrected the tonal curve to brighten up the lower midtones a bit.
Like usual, I put in some title and tags using RawTherapee. Done. Upload to Flickr and insert it here to write this article about it.
To learn this and much more, consider reading David Hobby’s Strobist site. Go at least through his 101 course which costs absolutely nothing (not even a subscription or login). Then get some cheap lights (like my 40$/€ Yongnuo), and get going. It’s fun – and like someone once said, if you take a picture, you might as well try to take a good one.
Thanks for reading.
It all began when my colleague Arno asked me about a camera. And this time his question was about a real camera, a Sony A6000.
Well, I told him, that one is at least as good as mine – its autofocus should be way faster especially on moving subjects, the sensor is APS-C, so a bit bigger, dynamic range could be better, whatever – you know the drill. No built in image stabilization was the only contra argument I could memorize without comparing actual spec sheets. Oh, and – how many – 20 Megapixels? Anyhow, more than enough of these as well. The fact that it’s not too expensive – in the same ballpark like an E-M10 or -Mark2 – was an additional plus. Everybody’s darling, I told him, and that he should get one if he saw a good offer.
A week went by, then another one, and finally I asked if he bought it, and he said no. He still wanted to make financial plans for this year together with his CFO 😉
In the end I decided to lend him my Olympus E-PL5 together with its kit zoom and the VF-2 electronic viewfinder. That would still leave the E-M10 in my bag, so I could live with that for a while.
Well, it never actually happened. He was about to take the camera – which he put into a bag first – into his car after having a smoke together with me, but he forgot to take his car keys, so we stood outside, smoking, bag with camera in his hand.
“See?”, he asked, adding “I guess I would never take that camera with me, it’s just too big, you cannot put it into a pocket, so it would probably stay at home all of the time”.
Ok I thought, thinking about alternatives. If my camera was out of the game, then so was the A6000 he had asked about, and I recommended a Sony RX-100 instead.
“Ask Basti”, I said, “he has one. First generation, they should be quite affordable by now”. Short internet check when we were up again – yep, slightly above 300€, fits. And Basti offered to bring his camera as well, so Arno could have a look before making a decision.
And that is what happened today. “Perfect”, was Arno’s comment, “that is the camera I want”. And so during our lunch break we took some photos:

Cameraman (my colleague Arno, trying Basti’s – or Nadine’s? – camera on me)
He really seemed to like that thing. While I took one photo of him, he took three of me (and several more):


Don’t directly compare these with the one I took. The Sony pictures are out of camera, while I “developed” mine from the Olympus raw file (.orf). Plus I had the 45mm/1.8 M.Zuiko lens on my camera – the Sony has a very good Zeiss zoom, but it can’t be opened that wide – and it’s of course way shorter to fit the 1″ sensor inside that camera.
Still, pretty good detail as far as I can tell – and these should have detail, 20 Megapixels of them. More than enough, like I told him.
Always glad if I can help. And thanks to Nadine and Basti who helped as well.
Thanks for reading.
Lego Mindstorms robots might have a problem if you have their EV3 control computer connected to a network. Original message is from Heise (in German, Google-translated version is here). Seems like Bashlite is attacking these, building some botnet with them.
So should you have Lego robots with that EV3 computer, it might be a good idea to scan your own network, and/or to block port 23 (telnet). Should your school have these, inform the teachers as well.
Just finished a portrait shooting with a male model who uses the artist name sifi. It was a too short portrait session in the limited space of our living room, so next time we’ll go into a studio where there’s more space, so we can show some of his great tattoos.
Here are two of the portraits we made:

Sifi

Sifi
Technical: I converted both photos into black & whites and simulated an orange filter in front of my camera. For the first of the two photos I also simulated Kodak Tri-X 400 film. For both I used my Olympus OM-D E-M10 camera with the M.Zuiko 45mm/1.8 lens at f/4.5. The light on the first photo was one of my studio strobes into a big umbrella, the second with the same hard and gridded light I used on myself yesterday.
Thanks for viewing.
One test setup for a portrait session tomorrow. Hard, gridded single light. Simulated Ilford FP4 Plus 125 b&w film. White table cloth from underneath. Black background. Cropped 5:4.

Self portrait
Thanks for viewing.